Clicking the “Contacts” tab on the top navigation bar, you’ll enter the function module for contacts. The first thing coming into sight will be the contact list page, which is also the place to manage contacts. Now, let’s work together to explore the features in this page.

Group your contacts
At the left side of the page, you may switch between groups to view different contact lists. Although contacts in each list may vary greatly, the features and the operations available to manage contacts are the same.
We’ve prepared three default contact groups: “All Contacts”, “Starred” and “Ungrouped”. Of course, you can create any number of groups as you wish and categorize your contacts into these groups accordingly.
All Contacts
The All Contacts group includes all the contacts in your MikeCRM organization, no matter how they come from: added manually, imported in bulk or created automatically by forms.
Starred
You may star your contacts to keep track of them. When you have one or more starred contacts, the contact list of the “Starred” group will be the default list you see after entering the Contacts module. In this way, you’ll easily find the more important contacts in no time.
Ungrouped
The Ungrouped list collects all contacts that haven't been categorized into any other contact group. You're highly recommended to move the ungrouped contacts into suitable groups based on your rules ASAP, because organized contacts certainly boost efficiency for future use.
Groups

The Contact Groups feature experiences a huge change in the new version of MikeCRM. It's no longer an independent module but has been embedded into the Contacts module, which aims to further ease contact management. Also, we’ve prepared 4 types of contact groups: Client, Partner, Colleague, and General. We sincerely hope the classification would help you reinstate the real role of each contact in your business and distinguish the close ones from the distant.
 A contact group can be created in four steps: click the “+ New Group” button, choose a group type in the pop-up window, name the group and click the “Save” button. It is very easy, isn’t it? If you want to change the name and the type of an existing group, just click the “Edit” icon at the right of the group name in the left column, where you may also stick important groups to the top.
In the old version of MikeCRM, contacts created by a form would be automatically classified into the auto-created contact group that was named after the form. When the data are migrated from the old version to the new one, the once auto-created contact groups will disappear and be replaced by the tags bearing the same names of the previous groups. By doing so, we can decrease the number of unnecessary groups, and enable you to use the tags to quickly search for and find all the contacts generated from the same form. After the data migration, the once manually-added contact groups will be classified into the General type of contact group, and you may change their types based on your actual situation.
Contact Lists
A contact list, consisting of many contact records, is the main content presented in the Contact Manager page. Although different groups may have various contacts in their lists, the features and the displayed items of each contact list stay the same. So, let's dig more deeply into the contact list.
The top left corner shows the name of the current contact list and the number of contacts in it. The top right corner displays the feature buttons used to manage contacts, namely “+ New”, “Import”, “Merge” and “Export current listed”. Detailed introduction towards these features will be presented in the following content.
Right below it, you’ll see the contact table made up of one contact record per row, one after another. The first row is the header, and the title in each column of the header stands for what contact information will be displayed in the column.
Bulk Edit
 At the left corner of the contact list header, there is a checkbox with a dropdown arrow next to it, which works as the selection function and can be seen in all kinds of lists in the MikeCRM. Clicking the checkbox will quickly select all the contacts in the current list, while hitting the dropdown arrow will display the Select menu for you to Select All or Select Shown contacts in the current list. Furthermore, you may select a contact in the list by mousing over the contact’s portrait thumbnail and selecting the checkbox changed from the thumbnail. When any contact in the list has been selected, the header part will turn into the “Bulk Edit” button.
At present, the available bulk edits include: Star, Unstar, Edit, Group, Add Tags, Remove Tags, Write Notes, Delete, Send SMS, Send Emails and Export. Some of them need to be specially noted.
Edit: editing a certain information item of the selected contacts in bulk will have two different effects, which are decided by the type of the modified item.
- The new content will replace the previous one, if the contact item to be modified belongs to the unique item of a contact, namely Gender, Title, City, Company, Department, and Job Title in the list.
- The new content will be added as another content, if the contact item is one of the non-unique items, namely Remarks, Websites, and Address in the list.

Send SMS/Emails: selecting one of the two options invokes the Mails or the Messages feature respectively, by which you may send emails or messages to the selected contacts. It’s very easy to use.
Export: differing from the “Export Contacts” icon at the top right corner above the contact list, the “Export” function in the “Bulk Edit” only works to export the selected contacts to an Excel file.
Customize Display Columns
Clicking the “Customize Display Columns” icon at the top right corner of the list, you’re able to customize the column items to be displayed in a specific order. That's to say, you may choose to show or hide these contact items and the additional information like “Created at”, “Created by” and “Source” etc. The changes apply to all contacts lists.
It’s easy to operate: check the items you want to show in the list, and drag & drop one item to reorder it. If you’re not satisfied with the adjustment, click the "Reset" button to get the default layout back.

Quickview of a Contact
Double clicking one contact record or hitting the right blue arrow will open the contacts Quickview window at the right side, which displays the existing information of the contact. In this way, you can view the basic information of a contact fast in the list page, with no need of jumping to the Contact Details page.
After the Quickview window has been opened, you may click other contact record at the left to view different contacts. This mechanism to switch Quickview content is used the same in the MikeCRM, which can be found in the form list, the email list and the message list. Besides, in the Quickview window, you can start/unstar the contacts, click the buttons at the bottom to visit contact details page or remove the contact.

Manage Contacts
Add a contact manually

The prerequisite to manage contacts is that contacts have already existed. Contacts can be added manually, imported in bulk, and gradually collected through forms that have contact widgets. In the Contact Manager page, you can create contacts manually and import contacts. Let’s see how to add contacts manually first.
At the top right corner of each contact list, there lies a green button “+ New”, by clicking which you’ll enter the page to create a contact. To add a contact, all you need to do is fill some information into the related contact items and then click the “New Contact” button. Also, you can group the contact at the left side of the page. Adding a contact manually is the process to input contact’s information one by one, during which you need to know a bit more about some items.
Name: contacts’ name looks like a simple information item but actually is a very complicated one, since it can be further broken down into given name, family name and nickname. In some cases, there are even prefix, middle name, and suffix in a name. As the most important information for a contact, name should be as complete as possible. So, you may need to click the down arrow at the top right of the Name and fill in each part of the full name. As for the common format “Name + Nickname", you can directly enter text following the pattern “Name (Nickname)”, and the system by itself will save the text inside the bracket as the nickname of the contact.
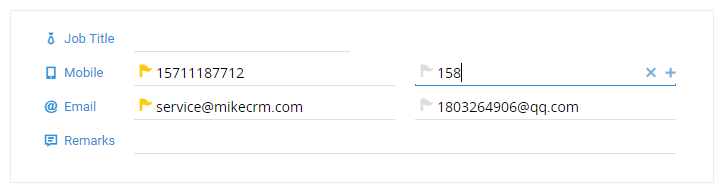
Non-unique items: in contact information, some items within a contact are unique and aren’t allowed to have more than one value. We call these items “unique items”, which include Name, Gender, Portrait, Title, Birthdate, City, Company, Department, and Job Title. Contrary to the unique items, the other items can have multiple values so that they are called “non-unique items”, which consists of Mobile, Email, Landline, Fax, Website, Address, Instant Messaging (such as Skype and WhatsApp), and Social Network (Facebook, Weibo, etc.). When you edit a non-unique item, you may click the right “+” icon to add multiple values to the item, like tying in several mobile phone numbers for the "Mobile".
More items: currently, there are plenty of popular instant messaging services and social networking sites. To maintain a well-organized layout, we hide the menu for richer IM or SNS options, but it will appear on the left side when you start to enter the contact information in the two parts.
Import Contacts
Adding contacts manually one by one is the basic method to create contacts, but it might be less efficiency when there are hundreds of or even more contacts. In such cases, you can use the feature “Import Contacts” to import a large number of contacts into your account and complete contacts migration.
MikeCRM supports you to import contacts from most commonly-used spreadsheets file types on Windows, Mac and Linux, such as CSV, Excel, vCard, WPS, Open Office, and Gnumeric. These files have covered most of the daily usage scenarios, and it’s very simple to import contacts via file: choose the method “Import from File”, drag & drop your contact file to the upload area, follow the prompts to set up the first row content, match the content in each column of your file with the related contact item in the system, and click "Next" to complete the import. We highly suggest you to set group and tags for the imported contacts, which helps later search and management.
There isn’t any special content layout requirement for the uploaded contact file. Just follow the basic format “one contact per row” and MikeCRM will do the rest work. The more automatic recognition we do, the smoother experience you will enjoy.

Tips: currently, “Import from File” is the only method available to import contacts. In the near future, we’ll launch the other methods like importing contacts from Email Contacts, WeChat official account and other CRM platforms.
Merge Contacts
Using address book, you might have encountered situations like: two contacts have the same given name and family name, but their phone numbers are different; or two people have the same phone number, but one is called “Professor Lee”, the other “Lee, Sr.”. The first principle of contact management is to avoid the information of the same people being saved under multiple contacts, because the scattered contact information will not play its role effectively even if you’ve made great efforts to collect it. So, how to tell whether two contacts are the same people or not? Let the “Merge Contact” feature handle the task for you! After a few steps of operation, you’ll have an organized contact list with no repeated contacts.
Simply put, the “Merge Contacts” feature in the MikeCRM will scan your contacts first. After that, these contacts sharing the same features (name, mobile number, Email etc.) will be merged automatically, while these contacts colliding with others in unique contact items or having possible duplicates will be sorted out for you to merge them manually. In other words, after you choose to merge contacts, the system will help you find out contacts that have the same information in their contact items and then automatically merge these contacts that have been identified as the same person based on some rules. However, you need to merge those contacts manually if the system finds difficult to confirm automerge or if some possible duplicates differ in unique items requiring your decision.

After clicking the blue button “Merge” over the contact list and then hitting the “Merge Duplicated Contacts” button at the new page, the system will start to scan all your contacts. When the scan is accomplished, the system will show you the result. Except the auto-merged contacts, you’re recommended to merge the rest by yourself, which have been classified into four groups according to their similarity degree, namely “Strongly suggested to merge”, “Suggested to merge”, “Possibly duplicated”, and “Not recommend to merge”. Referring to these results, you may know better about the contacts to be merged by yourself. After that, click the “Merge Manually” button below to start the process of manual merging.

During the operation, you may check the items you want to keep and confirm the merging by clicking the “Merge” button. Besides, you can choose “Never Merge” for these contacts that don’t need to be merged. It will save your time and energy since the “Never Merge” contacts would no long be scanned out again.
In fact, the mechanism of merging contacts by the system can also be triggered when contacts are created automatically by forms. This is why the Submits presented by one contact will converge on the timeline of the contact. Please do contact merging regularly to keep your contact lists well-organized.
Export Contacts
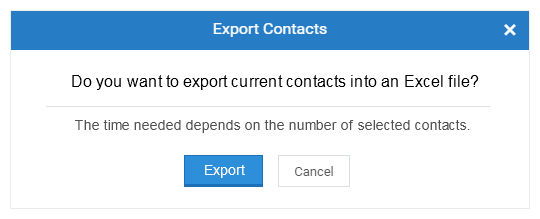
Contrary to the feature “Import Contacts from File”, the “Export Contacts” feature enables you to export all contacts in the current list (including the list of the filtered contacts) to an Excel file.
The operation is simple: click the “Export current listed” button at the top right corner of the contact list, and choose “Export” at the pop-up window to start exporting. Please note that, whether you have selected any contact or not, the system will always export all the contacts in the list. If the number of contacts to be exported exceeds 2,000, we’ll pack the contact file and send you an Email attaching the file to reduce the waiting time.
Tips: you may share contacts via file by filtering your contacts first, exporting the filtered contacts and sharing the exported file with other people. Besides, there is a highly effective way to modify contact information in bulk: add and edit the contact information in the exported Excel file, import the Excel file back into your MikeCRM account, after that, take advantage of the “Merge Contacts” feature to remove the duplicates.
Filter Contacts

Filtering contacts is the basic and frequently-used method to manage contacts, by which you can quickly sort out these contacts sharing the same features. Click the “Filter” button at the left column to open the “Contact Filter” pop-up window, set the filter conditions and hit the “Filter” button in the window, and there will be a “Filter Result” group at the left column that contains all the contacts meeting the filter conditions.
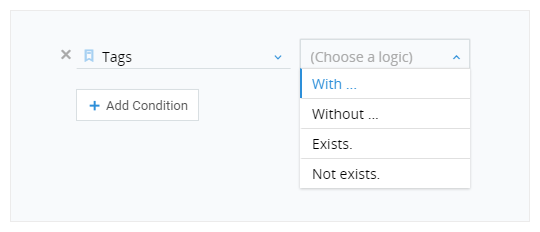
We have pre-defined some common filter conditions, such as “Email exists”, “Mobile exists”, “Mobile locality”, “Notes contain”, and “Tags contain”. These pre-defined conditions can also be achieved by the “Add Condition” below, where you can customize filter conditions covering every aspect of contact's personal information and the management information like contacts’ tags, group, note, starred contacts and so on.
Although there are many filterable contact items, most of them have the two filter rules: whether the item exists or not, and whether the item is with the keyword entered or not.
Moreover, as for some special information items, we’ve equipped them with unique filter function corresponding to their attributes. For example, you may choose the “Mobile” item as the filter object and then filter by the operator and the locality area of the mobile number, use “Note” to filter by the note creator, and apply “Birthdate” to filter by the age range. We’ll stop introducing more unique filter conditions here since you can master them at once during your usage. They are all named as concise function descriptions and can be understood at a glance.
You can use multiple conditions to compose the filter, which requires the filtered contacts to meet every condition at the same time, namely the filter logic between/among conditions is “AND”. Correspondently, one condition may contain several keywords, for example, “City contains New York, Miami.”, and contacts will be sorted out if they meet one of the keywords, namely the filter logic within one condition is “OR”.
Please note: adding multiple conditions that have the same filter object (contact item) and filter rule will be considered as one condition. For instance, the one-condition filter “City contains New York, Miami” is equal to the two-condition filter “City contains New York” and “City contains Miami”, where the filter logic is both “OR”.
Understanding the filter logic, you can combine conditions to filter contacts based on your needs, which may produce excellent fruits. For example, build a filter to find contacts who live in New York or Miami, have mobile number and will enjoy their birthday in the next month; classify these filtered contacts as a group and then use the Mass Messaging feature to send them discount information about birthday cakes. In this way, the conversion rate will be high, meanwhile, the message won’t disturb the non-targeted contacts.
Tips: knowing how to filter and search for contacts will boost your efficiency in contact management. We believe this article will help you a lot.